Celestial navigation explained
1) Introduction
2) Celestial mechanics - Equatorial Coordinate System
3) Celestial mechanics - Horizontal Coordinate System
4) Celestial mechanics - Spherical triangle and the celestial navigation equation
5) Traditional method: Lines of Position and intercepts
6) LOPs, cocked hat and common sense
7) Errors... and how to live with them
8) Random error and common sense
9) Random errors - a solution
1) Introduction
It is possible to find your position on Earth just by observing a few stars...
Celestial mechanics is precision mechanics and this allows calculating the exact position of a heavenly body (star, planet, moon, sun) in the sky at any given time.
Knowing the position of the star in the sky, the measure of the angle between the horizon of the observer and the star, using a sextant, is enough to determine the observer’s position in latitude and longitude (in fact, we will see that at least two measures are needed).
|
 |
Let's show this using an example: imagine you observe
a lighthouse from a certain distance. With the sextant, you measure the angle
alpha corresponding to the height of the lighthouse
seen from your position.
If you know the height h, you can find your distance d
from the lighthouse. On a chart, you can draw a circle centred on the lighthouse
with a radius d. You are somewhere on the
circle.
This is your circle of position.
|
A
second observation will give you a second circle of position. You are at the intersection
of the circles of position.
In fact, there is most often two intersections but your estimated position
or a third observation will help you to choose the right one. If you don't observe a lighthouse but the angle between your horizon and a
star, you are doing celestial navigation. That's it!
|
|
Of course, at this stage we need to look a little bit closer at the celestial
mechanics to understand how we can calculate the exact position of a heavenly
body (star, planet, moon, sun) in your local sky at any given time and which
mathematical relation is linking the altitude of a body to a circle of position.
Unfortunately, it is not as simple as tan(alpha) = h / d.
|
 |
2) Celestial mechanics - Equatorial Coordinate System
|
|
Imagine the Earth in space, and surrounded by a celestial sphere on which all the
heavenly bodies are moving. This is a quite simple representation of the universe,
but this is enough for our purpose.
The celestial sphere is centred on Earth with the celestial equator passing
through the Earth equator and the axis "Earth centre C to North Pole" defining
the axis of reference of the celestial sphere. A plan of reference defined on
Earth is also used on the celestial sphere: the Greenwich meridian.
On the celestial
sphere, we show a star S and its hour circle.
The star in the sky is like the lighthouse in the earlier example.
|
|
Let's put an observer on the Earth. The point Z
on the celestial sphere, which is directly above the head of the observer, is
called his zenith. The distance on the celestial sphere between the zenith Z
and the star S is the zenith distance z. The zenith distance is like
the distance d from the lighthouse of the previous example. We can draw a circle
centred on the star S with a radius z. We are somewhere on the projection
of this circle on the Earth. This is our new circle of position.
The position of the projection of the star on the Earth (latitude, longitude)
and the position of the star S itself on the celestial sphere are identical
(same angles, same reference plans: the celestial equator and the Greenwich
meridian).
|
The position of the star on the celestial sphere is given by its declination
delta
(90°N to 90°S) and its Greenwich
Hour Angle
(GHA, 0° to 360°).
|
 |
|
We can find both values for any given time in the Nautical Almanac.
Knowing delta
& GHA and measuring the zenith distance z,
we can find our circle of position and finally our position.
Let’s look more closely now:
|
|
Take the previous figure and wipe-off the surplus.
Note the latitude and co-latitude (90° minus lat),
the declination delta and polar distance Delta
(90° minus delta).
The figure is using the equatorial coordinate system
(the reference is the celestial equator). However, what we need is a reference
to our local coordinate system: the horizontal coordinate
system (the reference is the local apparent horizon).
|
|
At our position (Observer) on the Earth, we can
imagine the plan of our horizon with the four cardinal
points. If we move this plan to the centre of the Earth and redraw the figure
using this plan as reference, we get the next drawing.
|
 |
3) Celestial mechanics - Horizontal Coordinate System
The
reference is now the horizontal coordinate system.
When we observe a star from our local horizon, we can define its position in
the sky by its Azimuth (0° to 360°)
and its altitude h (0° to 90°).The zenith distance z is 90° minus h.
In practice, we are only measuring the altitude h
of the star, its azimuth is calculated.
|
 |
|
If you recall, we have already seen that our circle of position is centred on (delta,
GHA) with a radius z.
Thanks to the Nautical Almanac, we can define the position of the star S on
the celestial sphere (declination delta, Greenwich
Hour Angle GHA).
From our our local observation
of the star, we can measure its altitude and deduce its zenith distance z.
|
 |
We just need to find a mathematical relation between what we know (delta,
GHA, h) and what we
are looking for (latitude, longitude
Gw ) and that will solve the problem of the celestial
navigation! |
4) Celestial mechanics - Spherical triangle and the celestial navigation equation
|
The
hatched triangle on the top of the celestial sphere is the one we will use to
solve the celestial navigation problem.
The three sides of the triangle are:
col, the
co-latitude (90° minus latitude);
z,
the zenith distance (90° minus altitude h);
Delta,
the polar distance (90° minus declination delta).
The angle of the triangle opposite to the side z
is called the polar angle P (180°W to 180°E).
This angle is also the angular distance Q-D at the celestial equator:
Here: PE = gw - GHA*
This is a spherical triangle, not a plane triangle.
|
 |
While you may remember the formulas to solve a plane triangle in geometry, the formula for spherical geometry may not be quite so memorable?
As a recap, the triangle in plane geometry and the cosinus rule for the spherical geometry in the general case:
|
|
The
application of the general case to our problem:
|
 |
We found a mathematical relation between what we know (delta,
GHA, h) and what we
are looking for (latitude, longitude).
With
two observations, we get a system of 2 equations with 2 unknowns that we
are able to solve.
The celestial navigation problem is now resolved.
Of course, this resolution is not really simple by hand but for a computer the process is quite straightforward: it solves the system of equations by an iterative method using the estimated latitude and longitude as starting values.
With more than 2 observations, it’s even possible to improve the traditional method and to perform a statistical analysis:
- to give a certain weight to each observation according to its reliability
in the normal law model;
- to compute and eliminate the possible systematic error of the observer;
- to correct the assumed course and speed if enough observations are provided
(exactly the same way the GPS is able to give the course and speed of the
vessel if enough satellites are visible).
To do this, a program like ASNAv is using the least-square method
with iterative weighting adjustment by the Biweight function on a system of
equations given by the differential correction method. Each equation i looks
like:
 |
For a normal human being, solving such a celestial navigation equations system will take hours ! |
To check manually the results of celestial navigation programs, we can use
the traditional method of the Lines of Position (LOPs).
|
5) Traditional method: Lines of Position and intercepts
This method was invented in 1875 by the admiral Marcq de Saint-Hilaire (some
other sources say Y. Villarcau and A. de Magnac). The true line of position
A, tangent to the circle of position, can be merged into the line
of position B because the estimated position e
is close to the true position O.
On the line of position B, the intercept is the
difference between the true (observed) altitude and the calculated altitude:
Practically, the procedure is as follow:
- find the estimated position with an
accuracy of 50 nautical miles (in order to get a fix with 1 nautical mile
maximum error due to the method itself);
- observe with the sextant a star altitude Hs at the time C (GMT). See this nice animation from Joaquim Alves Gaspar on Wikipedia;
- correct the sextant altitude Hs with the instrumental error, the dip of
the apparent horizon, the terrestrial refraction, the astronomic refraction,
the parallax, the semi-diameter of the star (if needed) to get Ho (observed
altitude);
- compute the azimuth of the star using the estimated position and the data's
of the Nautical Almanac at the time C;
- compute the calculated altitude Hc;
- compute the intercept ITC = Ho - Hc;
- plot the line of bearing (azimuth of
the star) from the estimated position;
- plot the line of position perpendicular
to the line of bearing, at a distance ITC
from the estimated position, away if Hc
> Ho;
- start over again the steps 2-8, at least once, to get the drawing below:
O is the observer true (astronomic) position.
Note: ITC is used in this text as foreshortening for InTerCept
and is not an abbreviation. Don't confuse the intercept ITC with ITP -
the Intercept Terminal Point.
ITP is the point through which the circle of position passes. The LOP is
tangent to the circle of position at this point.
6) LOPs, cocked hat and common sense
Common sense is judgment without reflection, shared by an entire class, an
entire nation, or the entire human race (Giambattista Vico (1688-1744), Italian
philosopher)
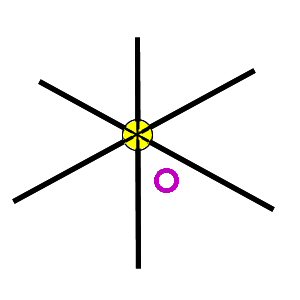
The observer astronomic position O is at the intersection of the 2 LOPs.
With 3 sextant observations, you get 3 LOPs and if you are very good and very
lucky at the same time, you could end up with LOPs intersecting like this:
Most often, however, you will get LOPs intersecting like this:
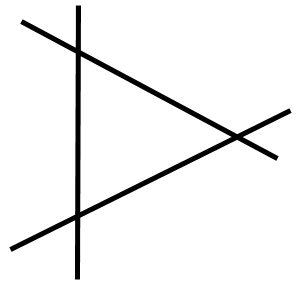
This triangle is known as a cocked hat  after
its resemblance to the common three-cornered hat of the times when these
navigation techniques were developed.
after
its resemblance to the common three-cornered hat of the times when these
navigation techniques were developed.
Where is exactly the observer astronomic position O?
Well, the common sense is telling us that O is exactly in the middle of the
triangle:
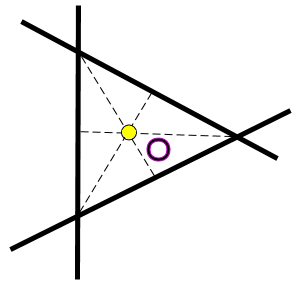
Unfortunately, the common sense is seriously misleading here...
| If (and only if) the observations azimuths are
spread over more than 180°, then the most probable position (MPP) is inside
the cocked hat, but with a probability of only 25%! |
7) Errors... and how to live with them
The reason why the 3 LOPs don't intersect as a point but as a triangle is the
observations errors.
The observations errors are:
- systematic error
- random errors
The systematic error is the algebraic sum of the uncorrected index
error of the sextant and the observer personal error. If not equal to zero, a
personal error shows the observer inclination to always overestimate or
underestimate the stars altitudes of a definite value.
The random errors depend on the observer experience and the
observation conditions (bad horizon, rolling ship, abnormal atmospheric refraction,
...).
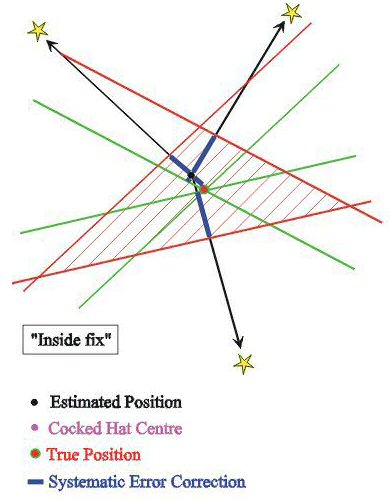
| If you are really experienced (and lucky) and there are no random errors,
then the systematic error can be eliminated by taking the cocked hat centre
as True Position ONLY IF the observations azimuths are spread over more than
180°. |
|
If the observations azimuths are not spread over 180°, the True Position
is NOT the Cocked Hat Centre. |
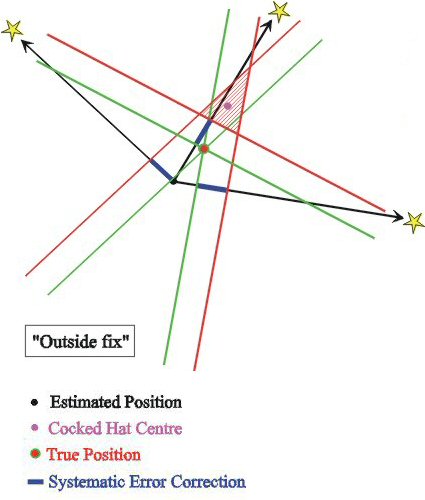
In this second case, to say that the True Position is the cocked hat centre, you need to correct 2
LOPs by moving them backwards and 1 LOP by moving it forward.
This is impossible because the systematic error is a constant of the same sign.
We have here an 'outside' fix: the True Position is outside the cocked
hat.
Knowing his own personal error (inclination to always overestimate or
underestimate the stars altitudes of a definite value) is the only way to find
the True Position.
If there are random errors (and there will be, no
matter how good observer you are), then the situation is even worse...
8) Random error and common sense
Random errors are inevitable... We can find in the Bowditch chapter 16 (Nathaniel Bowditch, The American
Practical Navigator, an Epitome of Navigation, pub. n°9 NIMA, USA, 1995) 19
possible errors when observing the celestial body height and 30 possible errors until the LOP
can be drawn on the chart.
In case of random errors, without further statistical analysis, the True Position can be
on the left or on the right of each LOP, with an equal probability.
Each LOP divides the world in 2 areas and the True Position has exactly 50% of
chance to be in one of them.
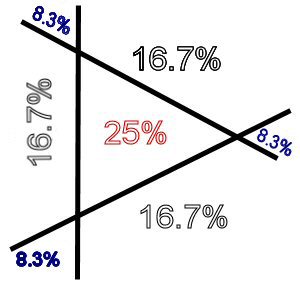
Let's call (arbitrarily) the zone inside the triangle +
+ +.
The names of the other zones follow directly:
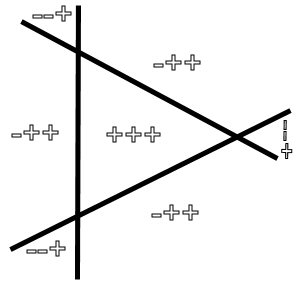
There is no - - - zone. The True
Position just cannot be in the - area of each LOP and the cocked hat
still be shaped as drawn!
So we know that the True Position is in the + area of at least 1
position line.
The True Position can be found by flipping a coin twice (head side is +, reverse side is
- and each occurrence has a 50% probability).
1) If the True Position is in the + +
+ zone, it needs to be in 3 + areas:
- we know that we are in 1 + area
- flip the coin, there is 1 chance among 2 to be in a second + area
- flip the coin again, there is also 1 chance among 2 to be in a third +
area
- so there is 1/2 x 1/2 = 1/4 chance to be in the +++ zone = 25%
probability
2) If the True Position is in a - +
+ zone, it needs to be in 2 + areas and 1 -
area:
- we know that we are in 1 + area
- flip the coin, we are in 1 + area or 1 - area
- flip the coin again, there is now 1 chance among 2 to be in the remaining +
or - area
- so there is 1/2 chance (50%) to be in a -++ zone
- as there are 3 -++ zones, 50% divided by 3 = 16.67% probability
3) If the True Position is in the -- +
zone, it needs to be in 1 + area and 2 - areas:
- we know that we are in 1 + area
- flip the coin, there is 1 chance among 2 to be in a - area
- flip the coin again, there is also 1 chance among 2 to be in a second - area
- so there is 1/2 x 1/2 = 1/4 chance (25%) to be in a --+ zone
- as there are 3 --+ zones, 25% divided by 3 = 8.33% probability
So by 1, 2 and 3, we can draw:
Conclusion
|
The True Position is the cocked hat centre if
there are no random errors and the observations azimuths are spread over more
than 180°.
If there are random errors, then the most probable position (MPP) is inside
the cocked hat but with a probability of only 25%.
In plain English, this means that there is a 75% probability for True
Position to be outside the cocked hat...
|
9) Random errors - a solution
Random errors are inevitable.
With random errors, there is a 75% probability for True Position to be
outside the cocked hat.
How to trust the ship position drawn on the chart, then?
More helpful than the cocked hat or the MPP (Most Probable Position) by
itself is the
confidence ellipse.
The confidence ellipse defines the area within which the True Position
lies with a given probability (95% or 99% for instance).
A statistical analysis is needed to be able to draw this ellipse.
Confidence ellipse characteristics:
- its centre is the MPP
- its size depends on the size of the random errors and on the chosen
probability
- its shape depends on the number of observations and distribution of the azimuths.
The confidence ellipse will normally overlap the
cocked hat partly.
Another advantage of the confidence ellipse is that this ellipse can be drawn for any number of LOPs and therefore give a
visual representation where the cocked hat fails to do so.
See the confidence ellipse
A program like ASNAv is able to draw the confidence ellipse around the MPP. It gives also
the radius of the circle of equivalent probability (as this is easier to
plot on the chart).
Click here to download the free version.